
Articles, Tips & Tricks and Tutorials
3 Essential Steps for Crafting Perfect Holes in Jewellery CAD Models
Creating precise holes in jewellery CAD models is crucial for setting stones accurately and ensuring the integrity of the final piece. Follow these essential steps to ensure that your holes are crafted perfectly for production.
Step 1: Determine the Correct Hole Size
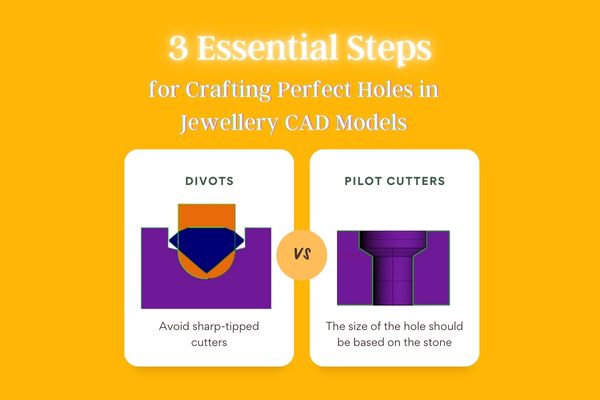
The size of the hole should be based on the stone that it's meant to accommodate. As a standard practice, the diameter of the pilot holes should be half the size of the stone's diameter. This ensures a snug fit without compromising the metal's strength.
Example:
For a stone with a 2-mm diameter, create a hole with a 1-mm diameter.

Image: Pilot hole with minimum 1.0mm diameter for a round gemstone with 2.0mm diameter
Step 2: Set the Appropriate Hole Depth
When creating the hole, its depth is equally important as its diameter. The depth should not exceed twice the diameter of the hole to prevent any casting issues or the hole from being filled during the process.
Example:
For a 1-mm diameter hole, the maximum depth should be 2 mm.

Image: A divot Cutter used to create a shallow cavity
Step 3: Use the Right Tools for the Job
If the metal is thicker than the maximum depth allowed for the hole, opt for divot cutters instead of creating full perforations. Divot cutters create a shallow cavity in the metal without piercing through it, leaving a blind end.

Image: Divot cutter with spherical tip

Image: Sharp-tipped divot cutter
Tip: Avoid sharp-tipped cutters to minimize casting difficulties. Instead, use a divot cutter with a spherical tip to create a recess for the stone, as shown in the accompanying image.
Remember, the stone setter can always refine the depth or pierce through the metal if necessary during the stone-setting process. By following these steps, you'll ensure that your jewellery CAD models are prepared correctly for production, leading to beautifully set stones and high-quality finished products.

Would you like to receive the latest tutorials, tips & trick in your inbox?